
Discover 25 Adorable Baby Braid Styles Every Mom Needs to See!
Looking for cute ways to style your little one’s hair? Check out these 25 baby braid styles every mom should see once!
From simple to intricate designs, these adorable braids will not only keep your baby’s hair neat but also add a touch of charm to their look.
1. Classic Three-Strand Braid

The classic three-strand braid is a timeless hairstyle that every mom should know. Simple yet stylish, it works for any occasion, from playdates to parties. Here’s how to create this adorable look for your little one.
Steps to Create a Classic Three-Strand Braid:
- Start with Clean, Dry Hair
Make sure the hair is clean and tangle-free. Brush through to remove any knots. - Gather the Hair
Collect all the hair at the back of the head. You can choose to part it in the middle or on the side, depending on the desired look. - Divide into Three Sections
Split the gathered hair into three equal sections. Hold one section in each hand and the third section in the middle. - Cross the Strands
- Take the right section and cross it over the middle section.
- Now, the right section becomes the middle section.
- Next, take the left section and cross it over the new middle section.
- Repeat
Continue alternating the strands until you reach the end of the hair. Remember to keep the tension even for a neat braid. - Secure the End
Use a small hair tie to secure the braid. Make sure it’s tight enough to hold the braid in place.
Tips for a Perfect Braid:
- Use a Detangler: If your little one has fine or curly hair, spritz a detangler to make the process smoother.
- Add Accessories: Top off the braid with cute hair ties or ribbons for added flair.
- Practice: The more you practice, the quicker and neater the braid will become.
The classic three-strand braid is versatile. You can wear it high, low, or even to the side. It’s quick to do and always looks adorable, making it a must-try for every mom!
2. Fishtail Braid for a Fun Twist

The fishtail braid adds a playful vibe to any little one’s look. This style stands out with its unique texture and intricate appearance, making it perfect for both casual days and special occasions.
How to Create a Fishtail Braid
- Start with clean, dry hair. Brush through to remove any tangles.
- Gather the hair. Pull it into a low ponytail or leave it loose for a more boho look.
- Divide the hair. Split it into two equal sections.
- Begin the braid.
- Take a small piece from the outer edge of the first section.
- Cross it over to the second section.
- Repeat by taking a small piece from the outer edge of the second section and crossing it back to the first.
- Continue until you reach the end. Secure with a hair tie.
- Gently pull on the braid. Loosen it slightly for that messy, effortless style.
Tips for the Perfect Fishtail Braid
- Use a texturizing spray. This helps the braid hold better and adds grip.
- Practice on longer hair. It’s easier to master with a bit more length.
- Accessorize. Add cute clips or ribbons to brighten up the look.
- Make it thicker. Pull sections of the braid to create volume.
Variations to Try
- Side fishtail braid. Shift the braid to one side for a cute, asymmetrical look.
- Double fishtail braids. Create two braids for an adorable twin style.
- Messy fishtail braid. Don’t worry about perfection; a tousled braid looks fantastic.
The fishtail braid is a fantastic way to keep hair stylish and neat. It’s simple enough for everyday wear yet elegant enough for parties. Give it a try and enjoy the compliments!
3. Dutch Braids: The Inside-Out Style

Dutch braids stand out for their unique, raised look. This style flips the traditional braid upside down, creating a fun and eye-catching effect. Perfect for any occasion, Dutch braids keep hair neat while adding a touch of flair.
How to Create Dutch Braids
- Start with Clean, Dry Hair: Brush out any knots to make the braiding process smoother.
- Section the Hair: Divide the hair into two equal parts. You can choose to start with a center part or a side part based on your preference.
- Begin Braiding:
- Take a small section from the front of one side.
- Split it into three smaller strands.
- Cross Under: Unlike traditional braids, cross the outer strands under the middle strand.
- Add more hair from the scalp to each outer strand before crossing under.
- Repeat on the Other Side: Once you reach the nape of the neck, continue braiding the remaining hair in a regular braid without adding new sections.
- Secure the End: Use a hair tie to keep the braid in place.
Styling Tips
- Accessorize: Add ribbons or small hair clips to make the braid pop.
- Messy Look: Gently pull on the edges of the braid for a looser, more relaxed style.
- Double Dutch: For a playful vibe, create two Dutch braids on each side.
Why Choose Dutch Braids?
- Versatile: Works for casual outings or formal events.
- Durable: Keeps hair secure throughout the day, perfect for active kids.
- Age-Appropriate: Suitable for toddlers to teens.
Dutch braids offer a stylish yet practical option for busy moms and playful kids. They keep hair out of the face while still looking adorable. Give this inside-out style a try and watch your little one’s smile shine even brighter!
4. Crown Braid for Princess Vibes

The crown braid brings out the inner princess in every little girl. This elegant style offers a touch of fairy tale magic. It’s perfect for special occasions or just a fun day of dress-up.
How to Create a Crown Braid
- Start with Clean Hair: Make sure the hair is clean and dry. This helps the braid hold better.
- Part the Hair: Create a deep side part. This will give the braid a fuller look.
- Begin Braiding:
- Take a section of hair near the front of the head on the side with more hair.
- Split it into three equal parts.
- Start a regular braid, but as you go, add small sections of hair from the scalp to the braid.
- Continue this process until you reach the nape of the neck.
- Secure the Braid: Once you reach the end, secure the braid with a hair tie.
- Wrap the Braid: Take the braid and wrap it around the head, creating a crown shape. Use bobby pins to secure it in place.
- Finish with Hair Spray: Lightly spray with a finishing spray to hold the style, especially if your little one will be active.
Tips for a Perfect Crown Braid
- Use Accessories: Add flowers, ribbons, or cute clips to enhance the royal look.
- Practice Makes Perfect: The crown braid can take a few tries to master. Don’t worry if it’s not perfect at first.
- Try Different Textures: Straight or wavy hair both work well. Experiment to see what looks best.
Why Choose a Crown Braid?
- Versatile: Suitable for any occasion, from playdates to birthday parties.
- Comfortable: Keeps hair off the face, making it easy to play.
- Unique Look: Stands out compared to typical ponytails or simple braids.
The crown braid truly transforms your little one into a princess. With a little practice, you can make this enchanting hairstyle a go-to for any event.
5. Messy Bun with Braided Accents

The messy bun with braided accents is a trendy choice for moms who want to keep things stylish yet effortless. This look combines the casual vibe of a messy bun with the charm of braids. Here’s how to rock this fun hairstyle:
Steps to Create a Messy Bun with Braided Accents
- Start with Clean Hair: Freshly washed hair works best. If your hair is a bit slippery, consider using a texturizing spray for grip.
- Create a High Ponytail: Gather your hair at the crown of your head. Secure it with a hair tie. The higher the ponytail, the messier and more playful the bun looks.
- Braid Some Sections: Take a small section of hair from the ponytail. Braid it loosely. You can opt for a regular braid, fishtail, or even a Dutch braid. Secure it with a mini hair tie.
- Form the Bun: Twist the ponytail around the base to create a bun. Use bobby pins to secure it in place. Don’t worry about perfection; the messier, the better!
- Add the Braided Accents: Wrap the braided section around the bun or let it hang down to frame your face. Pin it in place with bobby pins to keep it secure.
- Loosen Up: Gently pull at the bun to create more volume. Tug at a few strands around your face for that effortless look.
Tips for the Perfect Messy Bun
- Use Hair Accessories: Add cute clips or headbands for a little extra flair.
- Embrace Imperfection: The beauty of this style lies in its messiness. Don’t stress about every hair being in place.
- Experiment with Textures: Try this style with straight or wavy hair. Each texture offers a different vibe.
Why Moms Love This Style
- Quick and Easy: Perfect for busy mornings or playdates.
- Versatile: Works for casual outings or dressy events.
- Cute and Playful: Adds a fun touch to any outfit.
The messy bun with braided accents is a must-try for moms looking to blend style with practicality. Give it a shot and enjoy the compliments!
6. Double Braids for Extra Cuteness
Double braids bring a playful charm to any little one’s hairstyle. They add a fun twist while keeping hair neat and tidy. Here are some adorable ideas for double braids that every mom should consider:
- Classic Dutch Braids: These braids sit close to the scalp and have a raised appearance. They look great on any hair type and keep your baby’s hair in place all day.
- Fishtail Braids: This unique braid style gives a textured look. Split the hair into two sections and alternate small pieces from each side. It creates an intricate design that’s perfect for special occasions.
- Waterfall Braids: These braids allow some strands to cascade down while others stay woven. This style adds a bit of elegance and works well for both casual and formal settings.
- Lace Braids: Similar to French braids but with a twist. Only incorporate hair from one side. This style provides an understated look that’s still eye-catching.
- Bubble Braids: Create puffy sections by tying off small sections of hair with elastics. This style is fun and adds volume, making it perfect for playdates.
- Twisted Double Braids: Twist two sections of hair before braiding. This gives a cute spiral effect that stands out and looks adorable on little girls.
Tips for Double Braids
- Use Hair Accessories: Add colorful ribbons, clips, or bows at the ends of the braids for an extra pop of color.
- Keep It Loose: Don’t pull too tight. Loose braids feel comfortable and look effortless.
- Practice on Dry Hair: Wet hair can slip and make braiding more challenging. Dry hair holds the style better.
- Secure with the Right Elastics: Use soft, snag-free hair ties to avoid damage.
- Add Some Shine: A little leave-in conditioner can make the braids shine and look healthy.
Double braids not only look cute but also keep your little one’s hair manageable. Try out these styles for a fresh and fun twist on baby hairstyles.
7. Braided Pigtails Perfect for Playtime

Braided pigtails are a go-to style for active little ones. They keep hair out of the way while adding a fun twist. Here’s why they rock for playtime:
- Stay Put: The braids hold everything in place. No more tangled hair while your kiddo runs around.
- Cute Factor: Pigtails always look adorable. Add some colorful ribbons or clips for an extra pop.
- Versatile: You can switch up the braiding style. Try classic three-strand braids, fishtails, or Dutch braids for variety.
How to Create Braided Pigtails
- Start with Clean Hair: Wash and dry your child’s hair. Some leave-in conditioner can help with tangles.
- Part the Hair: Use a comb to create a clean center part from the forehead to the nape.
- Secure One Side: Clip one side of the hair to keep it out of the way.
- Create the First Braid:
- Divide the hair into three equal sections.
- Begin braiding by crossing the right section over the middle, then the left section over the new middle.
- Continue this until you reach the end.
- Secure with an elastic band.
- Repeat on the Other Side: Unclip the other side and repeat the braiding process.
- Finish with Accessories: Add ribbons or colorful hair ties to match your child’s outfit.
Tips for the Perfect Pigtails
- Keep It Loose: Don’t pull the braids too tight. A little looseness keeps it comfy.
- Use Hair Products Wisely: A light spray of hairspray can help tame flyaways without making it stiff.
- Get Creative: Mix in different braid styles in each pigtail for a unique look.
Braided pigtails bring fun and functionality together. Your little one will look cute and stay comfortable while playing all day!
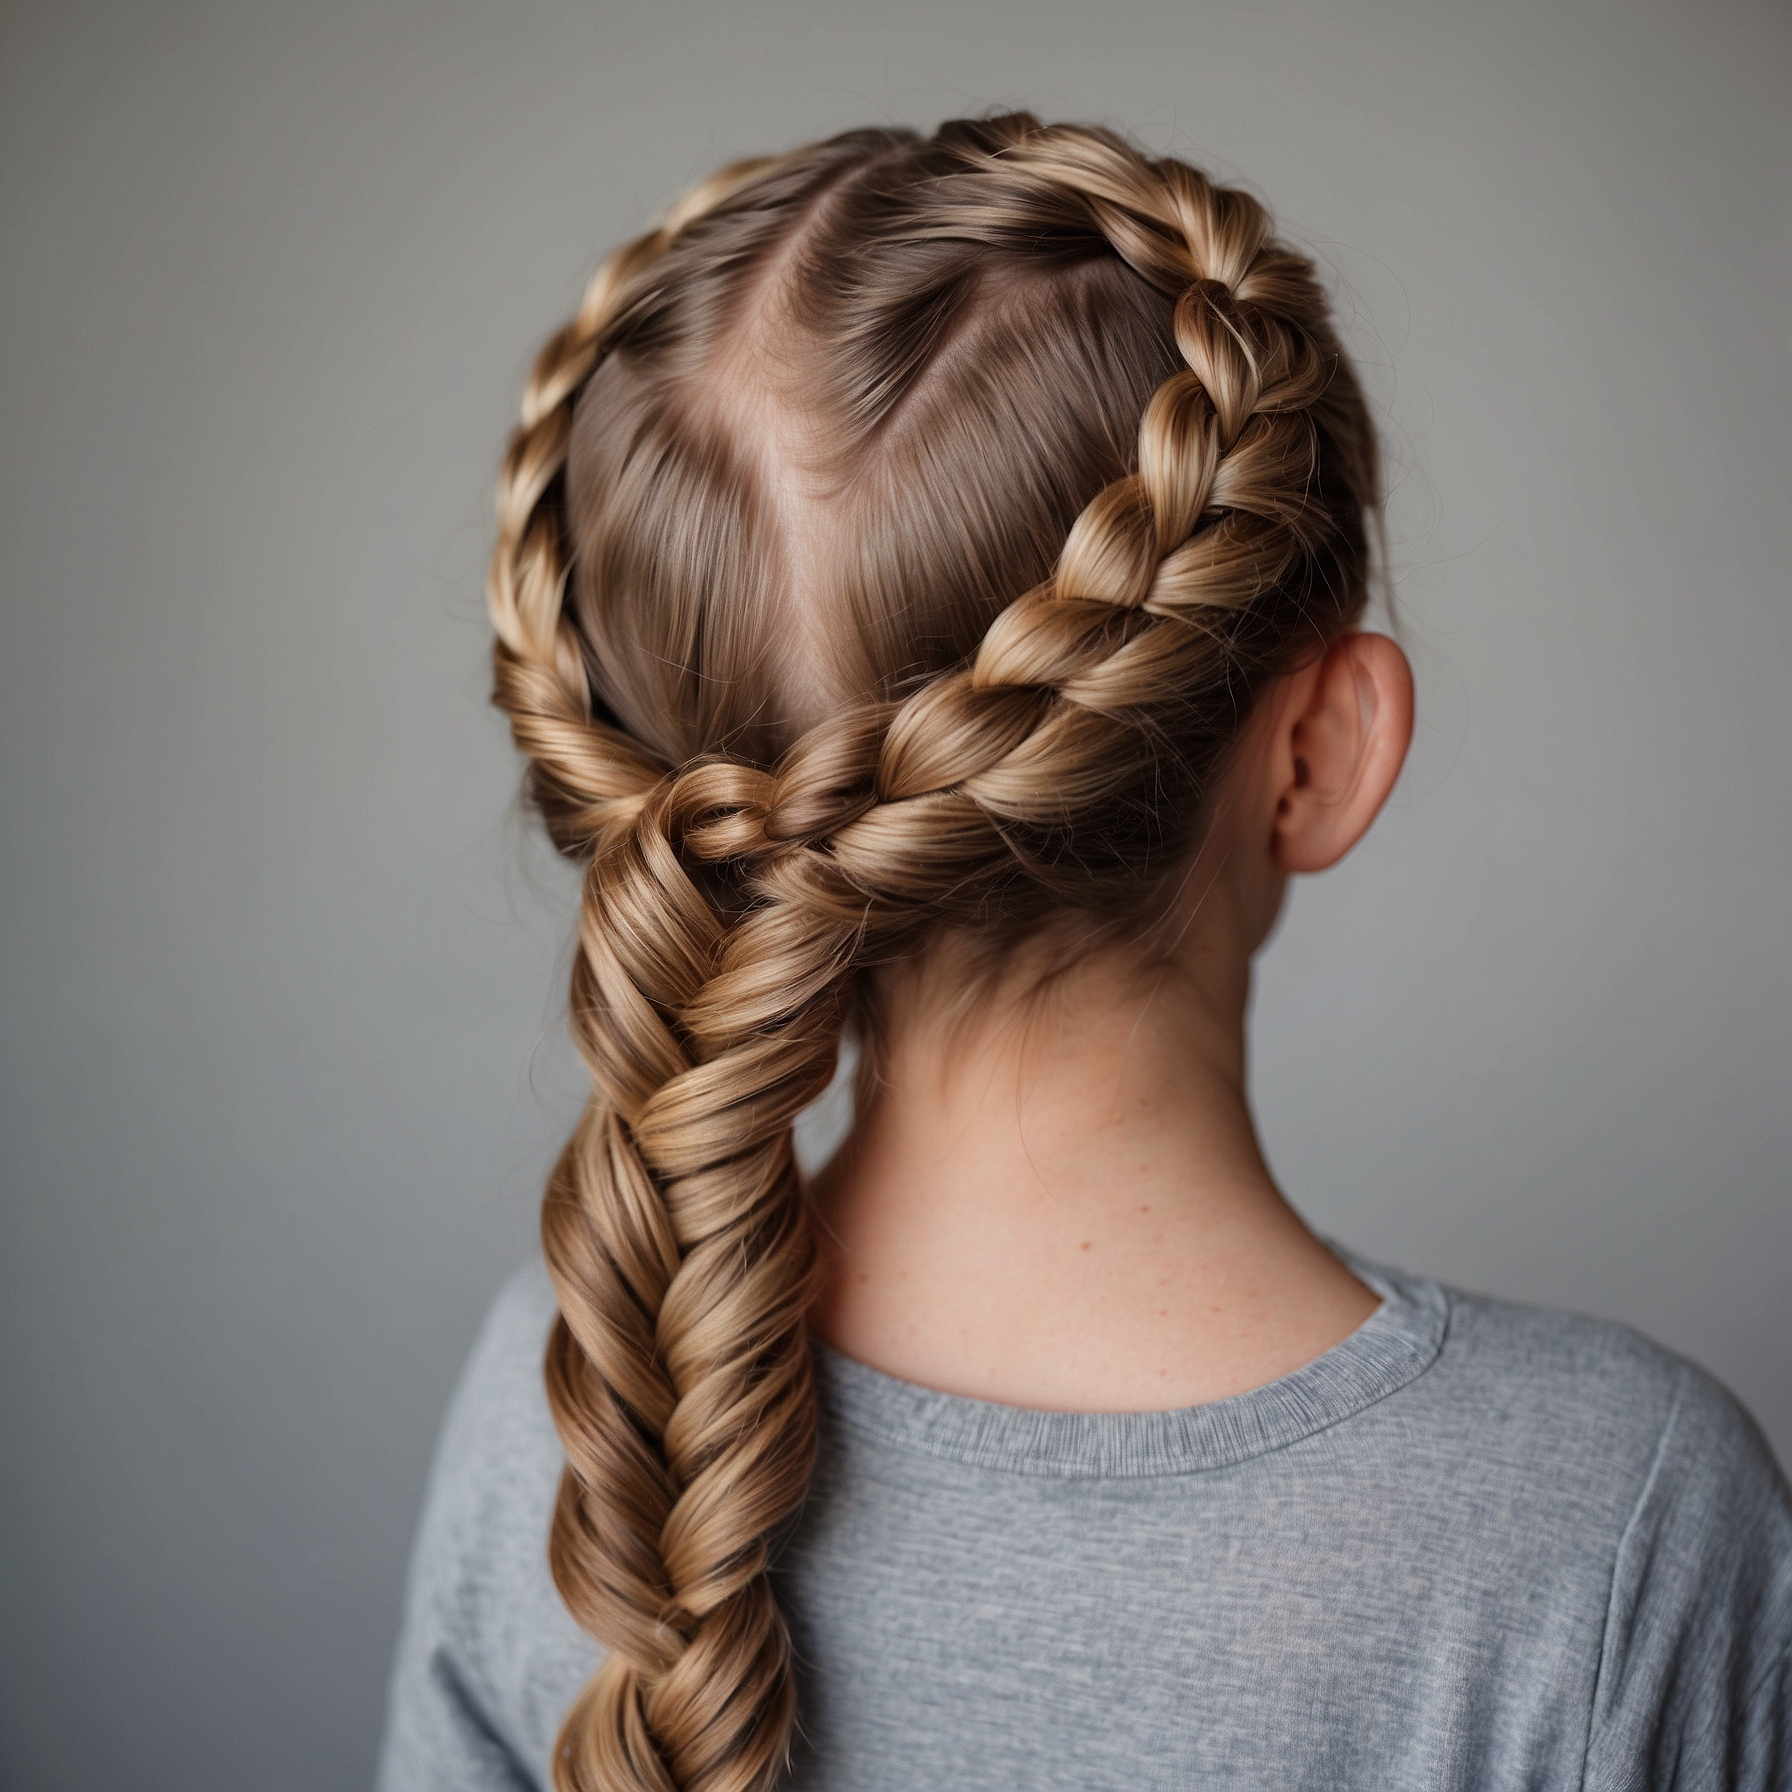
8. Side Braid for a Chic Look

The side braid is a timeless hairstyle that brings a touch of elegance to your little one’s look. It’s simple to create and works for any occasion, from playdates to family gatherings. Here’s how to rock the side braid with style.
Steps to Create a Side Braid
- Start with Clean Hair: Wash and dry your baby’s hair. Soft, clean hair makes braiding easier.
- Choose the Side: Decide which side you want the braid to hang. You can go with the left or right, depending on what looks best.
- Gather the Hair: Brush the hair to remove any knots. Gather all the hair to the chosen side.
- Divide into Sections: Split the hair into three equal sections. This will help you create a classic braid.
- Begin Braiding:
- Cross the right section over the middle.
- Cross the left section over the new middle section.
- Repeat until you reach the end of the hair.
- Secure the Braid: Use a small hair tie to hold the braid in place. Choose a color that matches your child’s hair for a seamless look.
Styling Tips
- Add Accessories: Use cute hair clips or ribbons to dress up the braid. This adds a fun touch.
- Messy or Neat: Decide whether you want a chic, polished look or a relaxed, messy vibe. Loosen the braid slightly for a more casual style.
- Texture is Key: For added volume, you can lightly tease the hair before braiding. This gives the braid a fuller appearance.
Occasions for a Side Braid
- School Days: Keep hair out of the face during class.
- Birthday Parties: A chic look that can match any outfit.
- Family Photos: A stylish option that looks great on camera.
The side braid offers versatility and charm. It’s an easy go-to style that every mom should master. Your baby will look adorable and chic in no time!
9. Ribbon Braid for a Pop of Color

The ribbon braid adds a fun twist to your little one’s hairstyle. It’s a simple way to introduce vibrant colors and make any outfit stand out. Here’s how to create this eye-catching look.
What You’ll Need
- A selection of colorful ribbons (about 1/4 inch wide)
- Hair ties
- Brush or comb
- Hair clips (optional)
Steps to Create a Ribbon Braid
- Prep the Hair
Start with clean, dry hair. Brush out any knots to ensure smooth braiding. You can also use a little leave-in conditioner for added shine. - Choose Your Ribbons
Pick two or three colors that complement your child’s outfit. Cut the ribbons to about 24 inches long. - Section the Hair
Divide the hair into three equal sections at the back. Secure the left and right sections with hair ties to keep them out of the way. - Add Ribbons to Sections
Take one ribbon and tie it to the center section. Make sure it’s secure, then split the ribbon into two parts, creating a “tail” for the braid. - Begin Braiding
Start braiding the three sections together. Every time you cross a section over, add a piece of ribbon from the corresponding side. Keep your tension even for a neat look. - Secure the Braid
Once you reach the end, tie off the braid with a hair tie. You can leave the ends of the ribbons loose for a playful vibe or trim them for a cleaner finish. - Finish with Hair Spray
Lightly spray the braid with a finishing hairspray to hold everything in place. This step helps keep the braid looking fresh throughout the day.
Tips for a Stunning Ribbon Braid
- Mix and match different ribbon patterns for a more unique look.
- Use wide ribbons for a bolder style.
- Incorporate beads or small hair clips for added flair.
The ribbon braid gives your child’s hair a splash of color and creativity. It’s perfect for parties, playdates, or just a day out.
10. Boho Braids with Beads
Boho braids with beads bring a fun and free-spirited vibe to any little one’s look. These styles mix classic braiding techniques with colorful beads for a playful touch. Here’s how to rock this style:
Styles to Consider
- Classic Boho Braid: Start with a simple three-strand braid. Add beads at intervals for a laid-back, chic look.
- Fishtail Braid: This braid creates a beautiful texture. Thread beads into the braid for added flair.
- Dutch Braid with Beads: This inverted braid stands out. Use larger beads to emphasize the braid’s depth.
- Braided Crown: Create a halo effect by braiding the hair around the head. Add beads to the ends for an enchanting finish.
- Side Braid: A loose side braid feels effortless and cute. Add beads for a pop of color.
Choosing the Right Beads
When it comes to beads, consider these options:
- Material: Look for lightweight plastic or wooden beads. They are gentle on hair and easy to work with.
- Size: Use smaller beads for tighter braids. Larger beads look great on looser styles.
- Color: Mix and match colors for a vibrant look. Go for pastel shades for a softer vibe or bright colors for a bold statement.
How to Style
- Prep the Hair: Start with clean, dry hair. Use a leave-in conditioner to prevent tangles.
- Section the Hair: Divide the hair into sections based on the desired braid.
- Braid: Begin braiding, incorporating beads as you go. Thread a bead onto a strand of hair before making the next braid section.
- Secure the Ends: Use a small hair tie to secure the ends of the braid. Add a bead at the end for a polished look.
Tips for Success
- Keep It Loose: Don’t pull too tight. Loose braids feel more bohemian and comfortable.
- Mix It Up: Combine different braid styles for a unique look.
- Accessorize: Add flowers or ribbons along with beads for extra charm.
Boho braids with beads make every little girl feel special while keeping the hairstyle fun and trendy.
11. Waterfall Braid for a Romantic Touch
The waterfall braid offers a dreamy, romantic vibe that’s perfect for any occasion. This style works well for special events or just a casual day out. Here’s how to create this stunning look for your little one.
How to Create a Waterfall Braid
- Start with Clean, Dry Hair: Brush through the hair to remove any tangles. This braid looks best on smooth hair.
- Section the Hair: Take a small section of hair from the front. This will be the start of your braid.
- Begin Braiding:
- Divide the section into three equal parts.
- Start a regular braid by crossing the right section over the middle, then the left section over the new middle.
- Add Hair to the Braid:
- After the first crossover, drop the bottom section instead of bringing it over.
- Pick a new section of hair from the top and add it to the middle strand. This creates the “waterfall” effect.
- Continue the Braid: Repeat the process down the side of the head. Keep adding hair from the top and letting the bottom section fall.
- Secure the Braid: Once you reach the desired length, secure the braid with a small hair tie. You can also use a bobby pin to hold it in place.
Styling Tips
- Add Accessories: Small flowers or hairpins can elevate the style, adding a touch of elegance.
- Messy Look: For a softer look, gently pull on the braid to loosen it a bit.
- Complement with Waves: Curl the remaining hair for a romantic finish.
Why Choose a Waterfall Braid?
- Versatile: Great for playdates, parties, or family photos.
- Age-Appropriate: Perfect for babies and toddlers, making them feel like little princesses.
- Easy to Customize: Adjust the size of the sections for a thicker or thinner braid.
The waterfall braid combines simplicity and beauty. It’s an easy way to style your child’s hair while adding a romantic touch that’s sure to impress.
12. Halo Braid for a Stunning Finish
The halo braid brings elegance and charm. It wraps around the head like a crown, making it perfect for special occasions or everyday wear. Here’s how to create this beautiful style for your little one.
Steps to Create a Halo Braid
- Start with Clean Hair
Wash and dry the hair. For added grip, apply a little mousse or styling cream. - Part the Hair
Create a deep side part or a middle part, depending on your preference. This gives a polished look. - Create a Braid
Take a section of hair from one side of the part. Divide it into three strands and start braiding. Use a regular braid or a Dutch braid for a more textured look. - Braid Until You Reach the End
Secure the braid with a small clear elastic. Make sure it’s tight enough to hold but not too tight to cause discomfort. - Wrap the Braid Around the Head
Position the braid along the hairline, wrapping it around the head like a crown. Use bobby pins to secure it in place. - Repeat on the Other Side
If desired, create a second braid on the opposite side and repeat the process. - Secure and Style
Tuck any loose ends under the braid and pin them down. Add decorative clips or flowers for a festive touch.
Tips for a Perfect Halo Braid
- Textured Hair Works Best
If your child has fine hair, consider adding curl or wave to create volume. - Use Hair Accessories
Ribbons, flowers, or jeweled pins can elevate the halo braid. - Practice Makes Perfect
Don’t worry if it doesn’t come out perfect the first time. Keep practicing to master the technique.
The halo braid suits girls of all ages. It’s a timeless style that brings out their inner princess. Whether for a birthday party or a family gathering, this braid will make heads turn!
Conclusion
Exploring baby braid styles opens up a world of creativity and fun for both moms and little ones. These 25 styles offer a mix of practicality and flair, making it easy to find the perfect look for any occasion. From simple twists to intricate designs, each braid showcases personality and charm.
Embrace these styles to make hair care enjoyable. Experimenting with different braids fosters a sense of confidence in your child’s appearance. Try these looks at home or save them for special events to create lasting memories. Happy braiding!


