
35 Stunning Dutch Braid Hairstyles for Every Age: Try These Trendy Looks!
Looking for stylish and versatile options to jazz up your hair? Check out these 35 Dutch braid hairstyles for every age to try!
From casual looks to elegant styles, there’s something here for everyone, making it easy to find the perfect braid to suit your vibe.
Whether you’re dressing up for a special occasion or just want to add a little flair to your daily routine, Dutch braids offer a fun and trendy way to express your personal style.
So grab your hair ties and get ready to dive into these fabulous braid ideas!
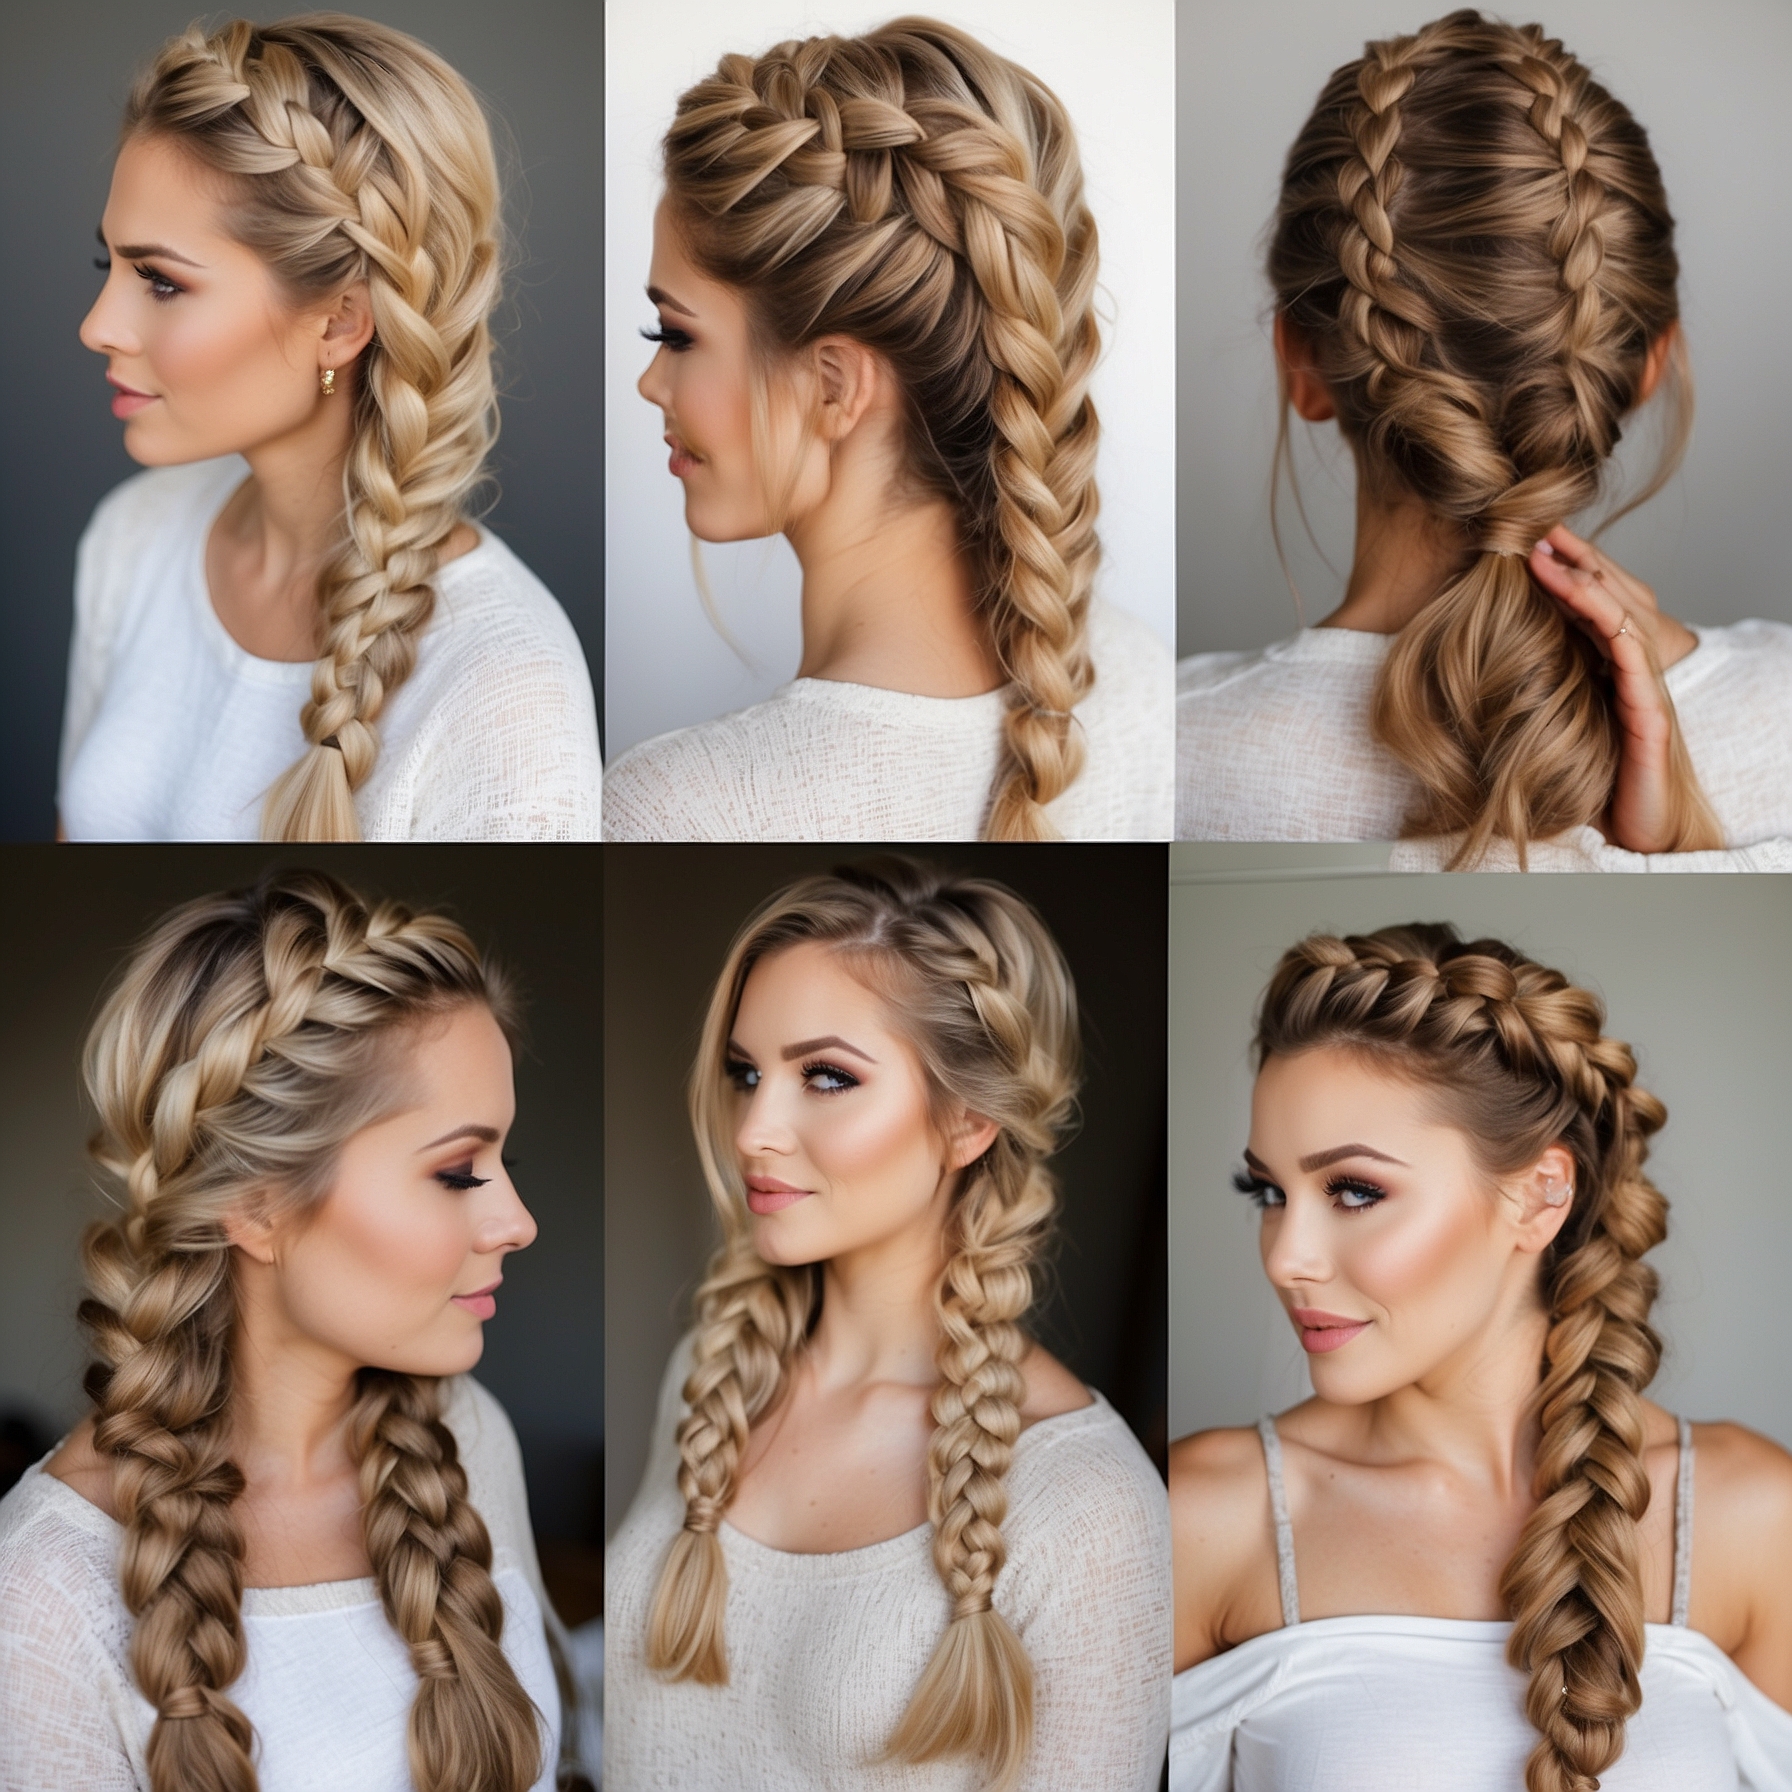
Classic Dutch Braid

The classic Dutch braid stands out with its unique, raised appearance. This style is perfect for all ages and works well for various occasions. It’s a versatile look that you can dress up or down, making it a favorite for many.
How to Create a Classic Dutch Braid
- Start with Clean Hair: Wash and dry your hair. Slightly damp hair makes it easier to work with.
- Section Your Hair: Divide your hair into three equal parts at the crown of your head.
- Begin Braiding:
- Cross the right section under the middle section.
- Then, cross the left section under the new middle section.
- Add Hair: Continue to add small sections of hair from the sides as you braid. Always cross the outer sections under the middle.
- Secure the Braid: Once you reach the nape of your neck, continue braiding without adding hair. Secure with a hair tie.
Tips for a Perfect Classic Dutch Braid
- Tight or Loose: Decide if you want a tight, polished look or a loose, bohemian style. Adjust your tension while braiding.
- Add Accessories: Incorporate ribbons, flowers, or clips for a fun twist.
- Use Products: Light mousse or hairspray can help keep flyaways in check.
Suitable Hair Types
- Straight
- Wavy
- Curly
Occasions to Rock a Classic Dutch Braid
- Casual Outings: Perfect for a day out with friends.
- Work: Keeps hair neat and professional.
- Formal Events: Dress it up with accessories for weddings or parties.
The classic Dutch braid remains a timeless choice. It suits various styles and occasions, making it a must-try for everyone. Whether you’re heading to school, work, or a party, this braid will keep you looking stylish and put-together.
Double Dutch Braids

Double Dutch braids add a playful and trendy vibe to any look. These braids work for all ages and occasions, whether you’re heading to school, a festival, or just hanging out with friends. They’re easy to master, and once you get the hang of it, you can create various styles.
How to Create Double Dutch Braids
- Start with Clean, Dry Hair
Wash and dry your hair. A little texture helps the braids hold better. - Part Your Hair
Make a center part from your forehead to the nape of your neck. - Section Your Hair
Divide your hair into two equal sections, one on each side. - Begin Braiding
- Take a small section of hair from the front of one side.
- Split it into three strands.
- Cross the right strand under the middle, then the left strand under the new middle.
- Add Hair
As you braid down, incorporate hair from the side into the braid. Keep it tight for a neater look. - Secure the Ends
When you reach the end, secure with a hair tie. Repeat on the other side.
Style Tips
- Messy Look: Pull out a few strands for a relaxed, boho vibe.
- Accessorize: Add ribbons or hair cuffs for extra flair.
- Half-Up, Half-Down: Try a half-up style with the braids, leaving the rest of your hair down.
Suitable for All Ages
- Kids: Fun and practical for school.
- Teens: Perfect for festivals and casual outings.
- Adults: Chic for work or brunch.
Variations to Try
- Fishtail Ends: Finish the braids with a fishtail for a unique twist.
- Dutch Crown: Wrap the braids around your head for an elegant updo.
Double Dutch braids are versatile and easy to adapt. Try them out, and let your creativity shine!
Dutch Braid Pigtails

Dutch braid pigtails bring a playful and youthful vibe to any look. They’re easy to create and perfect for all ages. Here’s how to style them and some fun variations to try.
How to Create Dutch Braid Pigtails
- Start with Clean Hair: Wash and dry your hair. You can add a bit of mousse for extra grip.
- Part Your Hair: Create a middle part from your forehead to the nape of your neck.
- Section Your Hair: Take one side and divide it into three equal sections.
- Begin Braiding: Start your braid by crossing the right section under the middle, then the left under the new middle.
- Add Hair: As you braid, add hair from the scalp into each section before crossing under.
- Secure the Braid: Once you reach the end, tie it off with a hair tie. Repeat on the other side.
Fun Variations
- Messy Dutch Pigtails: Pull out a few strands around your face for a relaxed look.
- Accessorized Pigtails: Use ribbons or colorful hair ties for a fun pop.
- Dutch Braid Bun Pigtails: Braid the hair and twist it into buns at the end for a chic style.
- Fishtail Finish: Instead of a regular braid, finish with a fishtail braid for a unique touch.
Styling Tips
- Use Hair Products: A light hairspray can help keep flyaways in check.
- Experiment with Textures: Try using wavy or curly hair for an added twist.
- Adjust Tightness: Make the braids tight for a polished look or loose for a casual vibe.
Perfect Occasions
- Casual Outings: Great for weekend brunches or trips to the park.
- Sporty Activities: Keeps hair secure during workouts or sports.
- School Days: A fun and stylish option for kids heading to school.
Dutch braid pigtails offer versatility. They suit various occasions and allow for personal style. Whether you choose a classic look or something more unique, these braids are a fantastic choice for everyone.
Dutch Braid Bun

The Dutch braid bun combines elegance with a touch of casual flair. This hairstyle works for any age and is perfect for various occasions, from a day at the office to a night out. Here’s how to rock the Dutch braid bun:
Steps to Create a Dutch Braid Bun
- Start with Clean Hair: Wash and dry your hair. You can also add some texturizing spray for grip.
- Section Your Hair: Divide your hair into three equal parts at the crown.
- Begin the Dutch Braid:
- Cross the right section under the middle section.
- Cross the left section under the new middle section.
- Continue adding hair from the sides as you braid, always crossing under.
- Secure the Braid: Once you reach the nape of your neck, secure the braid with a hair tie.
- Form the Bun:
- Twist the braid into a bun shape.
- Pin it in place with bobby pins for a secure hold.
- Finish It Off: Pull a few strands from the front for a softer look. Optionally, add hairspray for extra hold.
Variations to Try
- Messy Dutch Braid Bun: Create a looser braid and let some strands fall out for a relaxed vibe.
- Side Dutch Braid Bun: Start the braid on one side of your head for a chic asymmetrical look.
- Double Dutch Braids: Create two separate braids, twist them, and pin them into a bun for a fun twist.
Tips for the Perfect Dutch Braid Bun
- Use a light mousse or texturizing spray before braiding for better grip.
- If your hair is slippery, consider braiding when slightly damp.
- Choose decorative pins or clips to add flair to your bun.
- Experiment with accessories like flowers or ribbons for special occasions.
The Dutch braid bun is versatile and stylish. It suits any age and can be dressed up or down. Enjoy experimenting with this trendy hairstyle!
Dutch Braid Crown

The Dutch braid crown is a stunning and versatile hairstyle that adds a touch of elegance to any look. Perfect for various occasions, it works for all ages. Here’s how to create this beautiful style and some tips to make it shine.
How to Create a Dutch Braid Crown
- Start with Clean Hair: Wash and dry your hair. Use a bit of mousse for added texture.
- Part Your Hair: Create a center or side part, depending on your preference.
- Section Your Hair: Grab a section of hair from the front. This will be the start of your braid.
- Begin Braiding:
- Split the section into three parts.
- Cross the right section under the middle section.
- Cross the left section under the new middle section.
- Add Hair as You Go: As you braid, incorporate hair from the sides. Keep pulling in hair to create a thicker braid.
- Continue Around the Head: Move the braid along your hairline, adding hair until you reach the nape of your neck.
- Secure the Braid: Once you reach the end, secure it with a hair tie.
- Wrap the Braid: Take the braid and wrap it around the base of your head. Pin it in place with bobby pins.
- Finish with Hairspray: Lightly spray with hairspray to hold the style.
Styling Tips
- Pin the Braid: Use enough bobby pins to secure the braid for all-day wear.
- Add Accessories: Consider adding flowers or decorative pins for a special touch.
- Tease for Volume: Teasing the crown area adds volume and creates a more dramatic look.
- Messy Look: For a more relaxed vibe, pull a few strands out of the braid to soften the appearance.
Occasions to Wear
- Weddings: A perfect choice for brides or bridesmaids.
- Prom: Stand out with this unique and fashionable hairstyle.
- Casual Outings: Dress up your everyday look with minimal effort.
- Festivals: Keep your hair stylish and manageable while having fun.
The Dutch braid crown offers a chic and timeless option for anyone looking to elevate their hairstyle game. Whether you’re heading to a fancy event or just want to look cute on a casual day, this braid fits the bill!
Fishtail Dutch Braid

The Fishtail Dutch Braid combines the elegance of a Dutch braid with the unique texture of a fishtail. This style adds a fun twist to your usual braid, making it perfect for any age. Here’s how to rock this stunning look.
Steps to Create a Fishtail Dutch Braid
- Start with Straight Hair: Sleek hair works best for this style. Use a flat iron if needed.
- Create a Part: Decide where you want your part—down the middle or to one side.
- Section Your Hair: Take a small section of hair from the front and split it into two equal parts.
- Begin the Dutch Braid:
- Cross the right section under the left.
- Add a small piece of hair from the right side of your head to the right section.
- Cross it under again.
- Repeat on the left side, adding hair from the left side to the left section.
- Incorporate Fishtail Technique:
- As you continue braiding, switch to the fishtail method.
- Take a small piece from the outer edge of the right section and cross it over to the left section.
- Do the same with the left section, crossing a small piece over to the right.
- Continue Down: Keep alternating and adding hair until you reach the desired length.
- Secure the Braid: Use a small hair tie to hold the braid in place.
Tips for a Perfect Fishtail Dutch Braid
- Messy Look: Pull gently on the braid to loosen sections for a more relaxed vibe.
- Accessorize: Add ribbons, flowers, or clips to make your braid stand out.
- Practice: This style may take a few tries to master. Keep at it!
Ideal Occasions
- Casual Outings: Great for brunch or a day out with friends.
- Formal Events: Dress it up for weddings or parties.
- Everyday Wear: Perfect for school or work.
The Fishtail Dutch Braid offers versatility and charm. Experiment with different finishes to match your style.
Dutch Braid Ponytail

The Dutch braid ponytail is a fun and stylish option that suits all ages. This hairstyle combines the classic Dutch braid with a playful ponytail, making it perfect for casual outings or more formal events. Follow these steps to create this trendy look.
How to Create a Dutch Braid Ponytail
- Start with Clean Hair: Wash and dry your hair for the best results.
- Gather Supplies: You’ll need a hairbrush, hair ties, and optional styling products like mousse or hairspray.
- Section Your Hair: Part your hair down the middle or to one side, depending on your preference.
- Create the Dutch Braid:
- Take a section of hair at the front.
- Divide it into three equal parts.
- Cross the right section under the middle, then the left under the new middle section.
- Continue adding hair from the sides as you braid down towards the nape of your neck.
- Secure the Braid: Once you reach the nape, secure the braid with a hair tie.
- Ponytail Time: Gather all your hair, including the braid, and pull it into a ponytail. Secure with a hair tie.
- Finishing Touches: Gently pull at the braid to add volume. You can also wrap a small section of hair around the base of the ponytail for a polished look.
Tips for a Perfect Dutch Braid Ponytail
- Textured Hair: Slightly wavy or textured hair holds the braid better and adds dimension.
- Accessorize: Add fun hair ties or decorative pins to enhance the look.
- Volume Boost: Use volumizing products before styling for a fuller ponytail.
- Experiment: Try different heights for your ponytail. A high ponytail looks sporty, while a low one feels more sophisticated.
Variations to Try
- Side Dutch Braid Ponytail: Move the braid to one side for a unique twist.
- Double Dutch Braid Ponytail: Create two braids for a fun, double look.
- Braid and Bun Combo: Twist the ponytail into a bun for an elegant finish.
The Dutch braid ponytail is versatile and easy to master. Whether you’re heading to school, work, or a night out, give this hairstyle a shot!
Messy Dutch Braid

The messy Dutch braid brings a fun, relaxed vibe to your look. Perfect for casual outings or a day out with friends, this hairstyle adds texture and volume. Here’s how to rock a messy Dutch braid.
How to Create a Messy Dutch Braid
- Prep Your Hair
Start with dry, unwashed hair. Add some texturizing spray for grip and volume. - Section Your Hair
Divide your hair into three equal sections at the crown of your head. - Start Braiding
Cross the right section under the middle section, then cross the left section under the new middle section. Keep repeating this pattern while incorporating hair from the sides. - Loosen the Braid
Once you reach the nape of your neck, gently pull on the edges of the braid. This will create that messy, voluminous look. - Secure the Braid
Use a hair tie to secure the end of the braid. For extra flair, leave some pieces out around your face.
Styling Tips
- Messy Bun Combo: After braiding, twist the braid into a messy bun for a chic look.
- Accessorize: Add hairpins or flowers to give it a unique touch.
- Side Braid: Shift the braid to the side for a playful twist.
Ideal Occasions
- Casual Outings: Perfect for brunch or a day at the park.
- Festivals: Keep your hair stylish and practical while dancing.
- Beach Days: A great way to keep your hair out of your face.
Age Suitability
- Teens: Fun and trendy for school or hangouts.
- Young Adults: Versatile and stylish for any occasion.
- Mature Women: Classy yet casual for a relaxed day out.
The messy Dutch braid works for everyone. Whether you’re hitting the town or just running errands, this hairstyle keeps you looking effortlessly cool.
Dutch Braid with Highlights
Dutch braids look stunning on their own, but adding highlights takes them to the next level. This technique creates a beautiful contrast and adds depth to your hairstyle. Here’s how to rock Dutch braids with highlights:
Choosing the Right Highlights
- Color: Go for colors that complement your base hair color. Blonde highlights work well on darker hair, while caramel or auburn highlights pop on lighter shades.
- Placement: Highlight sections around the face to frame it nicely. You can also add some highlights throughout the braid for a more blended look.
Styling Tips
- Prep Your Hair: Use a heat protectant before styling. This keeps your hair healthy and shiny.
- Create the Dutch Braid:
- Start with clean, dry hair.
- Section off the hair at the top of your head.
- Divide the section into three parts.
- Braid under, adding hair from the sides as you go.
- Incorporate Highlights:
- If you have clip-in highlights, add them before braiding.
- If you have dye, consider lightening some strands before braiding for a more cohesive look.
Maintenance
- Color Care: Use sulfate-free shampoos and conditioners to keep the highlights vibrant.
- Regular Touch-Ups: Plan for touch-ups every 6-8 weeks, especially if you use bleach.
Ideal Occasions
- Casual Outings: Perfect for brunch or a day out with friends.
- Special Events: Great for weddings or parties where you want to stand out.
- Everyday Wear: A chic look for school or work.
Inspiration
Check out these variations of Dutch braids with highlights:
- Two Dutch Braids: Create two separate braids on either side, adding highlights for a fun, youthful look.
- Dutch Braid Ponytail: Braid your hair and gather it into a ponytail, showcasing highlights beautifully.
- Half-Up Dutch Braid: Braid the top half and let the bottom flow freely. Highlights peek through for a stylish contrast.
Experiment with different colors and styles to find what suits you best. Dutch braids with highlights are versatile and fun, making them a must-try hairstyle for everyone!
Dutch Braid Updo
Dutch braid updos offer a stunning way to elevate your hairstyle. This versatile braid works for casual outings and formal events. Here are some popular styles to consider:
- Classic Dutch Braid Bun
Start with a standard Dutch braid down the back of your head. Once you reach the nape, twist the braid into a bun and secure it with bobby pins. This look is chic and elegant. - Messy Dutch Braid Updo
For a more relaxed vibe, create a loose Dutch braid on one side and pin it into a messy bun. Let some strands fall free around your face for a soft, romantic look. - Double Dutch Braid Updo
Create two Dutch braids on either side of your head, then pin them into a low bun at the back. This style adds texture and dimension. - Dutch Braid Crown
Braid sections from both sides and pin them into a crown around your head. This boho-inspired look works well for festivals or beach days. - Dutch Braid with Twists
Start with a Dutch braid and incorporate twisted sections of hair. Wrap the braid into a bun and secure with pins. The twists add a fun twist to the classic braid.
Tips for Creating a Dutch Braid Updo
- Prep Your Hair
Use texturizing spray for better grip. Clean hair can slip, making it hard to hold the braid. - Sectioning
Divide your hair into sections before starting. This keeps everything organized and makes the braid easier. - Tightness
Keep the braid tight for a polished look. However, loosen the strands slightly after pinning to add volume. - Accessorize
Add hairpins or floral accents to your updo for a special touch. This enhances the overall look. - Practice
If you’re new to Dutch braids, practice a few times before the big day. It gets easier with time.
Dutch braid updos suit every age and occasion. Whether you’re going for something formal or casual, these styles will turn heads. Try them out and find your favorite!
Side Dutch Braid
The side Dutch braid adds a fun twist to the classic braid. It’s stylish and works well for any occasion. You can dress it up for a night out or keep it casual for everyday wear. Here’s how to rock a side Dutch braid at any age.
How to Create a Side Dutch Braid
- Start with Clean Hair: Wash and dry your hair. A little texture helps the braid hold.
- Gather Your Hair: Flip your head to the side. Grab all your hair on one side of your head.
- Section Your Hair: Divide the gathered hair into three equal parts. This is your starting point.
- Begin Braiding:
- Cross the right section under the middle section.
- Cross the left section under the new middle section.
- Add hair from the side of your head into the braid as you go.
- Continue Down: Keep braiding until you reach the ends of your hair. Secure with a hair tie.
Styles to Try
- Messy Side Dutch Braid: Pull out a few strands for a relaxed look. Perfect for casual outings.
- Fishtail Side Dutch Braid: Mix it up by incorporating a fishtail. It adds an intricate feel to your braid.
- Accessorized Side Dutch Braid: Use ribbons, clips, or flowers to make your braid pop. Great for special occasions.
Suitable for All Ages
- Kids: A playful look for school or playdates.
- Teens: Trendy and effortlessly chic for hanging out with friends.
- Adults: Sophisticated enough for work or a night out.
Tips for a Perfect Side Dutch Braid
- Use Hair Products: A bit of mousse or texturizing spray gives grip.
- Practice: Mastering the technique takes time. Keep practicing for a flawless finish.
- Experiment: Try different lengths and thicknesses for your braid. Find what suits you best.
The side Dutch braid is versatile and easy to style. It remains a favorite for good reason.
Dutch Braid with Accessories
Dutch braids shine even brighter when you add accessories. They elevate your look and let your personality pop. Here are some fun ways to jazz up your Dutch braid:
- Hairpins: Use decorative hairpins to secure your braid. They add sparkle and can match your outfit. Try floral or geometric designs for a unique touch.
- Ribbons: Weave colorful ribbons through your braid. Pick shades that match your outfit or go for a bold contrast. Ribbons add a playful vibe.
- Flowers: Fresh or faux flowers can bring a romantic feel. Place them at the base of the braid or tuck them in. Choose small blooms for a subtle look.
- Beads: Add beads to the ends of your braid. You can use clear, colored, or metallic beads. They catch the light and make your hairstyle stand out.
- Headbands: Slide on a thin headband over your braid. This gives a chic appearance while keeping stray hairs in check. Try embellished headbands for extra flair.
Styles to Try
- Boho Dutch Braid: Incorporate small flowers and earthy tones for a laid-back look.
- Glam Dutch Braid: Use glittering hairpins and a sleek finish for a night out.
- Sporty Dutch Braid: Weave in a bold ribbon and tie it off with a fun bow for an active day.
- Vintage Dutch Braid: Add a lace headband and curls for a classic feel.
Tips for Accessorizing
- Keep it simple. Choose one or two accessories to avoid overwhelming the braid.
- Match your accessories to the occasion. Go bold for a party, subtle for everyday wear.
- Experiment with placement. Try different spots for flowers or pins to find what looks best.
Accessorizing your Dutch braid can transform your hairstyle from ordinary to extraordinary. Have fun mixing and matching styles and accessories.
Conclusion
Dutch braids offer a stylish and versatile option for anyone looking to elevate their hairstyle game. From classic looks to modern twists, these braids suit every age and occasion. Experiment with different lengths, textures, and accessories to create a unique look that reflects your personality.
No matter your hair type or skill level, there’s a Dutch braid style for you. Embrace the creativity and fun of braiding. Let your imagination run wild and try out these 35 hairstyles, making them your own. Enjoy the process and wear your braids with confidence!


